Sunday, January 6, 2013

Valves do more than up and down

Engine restoration and tuning starts with some cosmetic work. I removed the A/C compressor, the A/C evaporator and the A/C condenser (saving about 50 pounds) and started removing all the vacuum hoses and some electrical lines. After that I started to attack the pieces of the engine that were covered in oil debris and flaking red paint. As a refresher, here's what the engine started looking like.


So I removed a valve cover, the water neck and the thermostat housing (upper radiator). The intake manifold would be next, but I need to find out how to remove the anti-freeze and dispose of it safely. The water neck and the thermostat housing have been selected to be a nice grey and the valve cover will be a nice blue with the "International" script in a grey that matches the water neck and the thermostat housing. Enough blabbery. I will let the pictures speak for themselves.


Once the cover was removed, I had to get all the rust, paint and caked on oil from the valve cover.


Then the "prime" color.


Then the masking of the script.


Then the final top coat.


All in all it was about 5 - 6 hours for the valve cover alone. I'm glad there are only 2 of these. I do think I'll pull the engine out of the body and repaint the block this blue. It looks really good.

Saturday, December 15, 2012

The benefits of a toddler

By the way, one more little trick to all you out there that have an issue with a stuck hood latch: a 25 - 30 pound toddler does remarkably well loading the spring so you can sufficiently unlatch the hood.

Thanks, Joey.

Friday, December 14, 2012

Some deconstruction

So the first part of getting this thing the way I want it will be to do evaluation and analysis of what needs replacement as well as doing some general tear down. I started by cleaning the cab.

Before:
The dash is in disarray

Nice collection of, well, crap

So I gave 'er a quick clean to get the bulk of the mouse poop, squirrel mess, rust and doe-in-heat canisters out of the way and started to tear apart the things I wanted to redo in my image (i.e. dash).

So shiny!


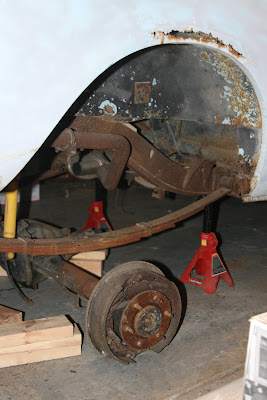
At this point I had the benefit of a helper, so I recruited him to help me drop the rear axle and remove the rear tires. It makes it look much better and this allows me to choose if I want to work on springs or on interior at any given time.


 He also helped with taking the hood off to evaluate the engine. Looks like I'll need to retrace or reroute most of the vacuum lines, replace a spark plug wire, perhaps some worn distributor points and some general TLC of the carb, but overall things look promising to start this baby up. Of course that's hard to do when the rear axle won't spin, but those are minor details. :)

We can rebuild it. We have the technology.
So next is getting a hold of a grinder and starting to remove the parts of the body that won't do. I also still need to find a way to remove that pesky top...

Sunday, December 9, 2012

The Beginning

So I took the plunge. I got a bucket list item checked off. I finally got a project car. I found a 1977 International Harvester Scout II on Craigslist in Lancaster, KY and promptly snatched it up. It's a 3 speed manual and a 345 V8 in the hood. It was nice enough to follow me home.


 Now, going into what I know at the beginning of the restoration is as follows:
  1. Extensive body work is needed, specifically the entire floor, some outer patches and a sealer of some type on the 35 year old frame.
  2. The motor, a 345 V8, runs, but is finicky. I would say it's likely a carb issue, combined with neglect, perhaps some off timing and maybe some bad fuel/spark issues to chase.
  3. The interior is crap.
  4. The rear axle needs replacement. 
The previous owner (PO) had put a Chevy rear end on a spring-over-axle lift (see wonky alignment, above). He didn't know what ratio the rear end was and I'd like to not take the chance in torching the transfer case. It still has the original Dana 44 in the front, so I'd like to upfit the rear with another Dana 44, drop the lift and put back on reasonably sized tires and rims.

But first is first. Clean-up. So I started cleaning and working to remove the top from the car. By the end of night one I had the rear floor pan clean and the top wedged partially off. Three more screws and the entire ball of wax will come out.

Pop that lid

Day 2 will involve more cleaning, removing the top and accumulating everything for the first scrap run. I'm going to try and sell the top as is and recoup some of the investment. Soon enough I'll need a grinder and a welder, though.